Siemens S7-300PN/400PN / SIMATIC Manager
Requirements
The communication works on the S7-300PN, S7-400PN, IM151-8 and WinAC RTX controls via the Profinet interface.
The following blocks and sources are needed for the connection to the Connector:
• All blocks and sources in the folder S7-Programm
All blocks are programmed in SCL. All configuration settings are carried out in the sources. The advantage of this is that all blocks are regenerated with the new settings through the SCL script «MakeALL». The symbolic name is relevant for the generation.
Calling up fbSql4Siemens
The «fbSql4Siemens» block is called up cyclically. We advise you to do this with a time-controlled OB (e.g. OB35, T=10ms). The following parameters are set:
Parameters of fbSQL4Siemens
xExecute : BOOL; // start databank query
iIP1 : INT; // 1. digit of the configured IP addr. of the SQL4automation Connector
iIP2 : INT; // 2. digit of the configured IP addr. of the SQL4automation Connector
iIP3 : INT; // 3. digit of the configured IP addr. of the SQL4automation Connector
iIP4 : INT; // 4. digit of the configured IP addr. of the SQL4automation Connector
iRemotePort : INT; // configured port number of the SQL4automation Connector
iLocalPort : INT; // port which is used locally on the control
tTimeout : TIME // timeout in seconds
xAbort : BOOL; // reset
xHoldConnection : BOOL; // keeps the socket connection open after a database query
iConnectionID : INT; // distinct ID of the connection
wLocalDeviceID : BYTE; // controller type: *- B#16#01: IM151-8
- B#16#02: CPU 31x-2 PN/DP, CPU 314C-2 PN/DP, IM154-8 CPU.
- B#16#03: CPU 319-3 PN/DP
- B#16#05: CPU 412-2 PN, CPU 414-3 PN/DP, CPU 416-3 PN/DP, CPU 41x-5H PN/DP (Rack 0)
- B#16#05: CPU 41x-5H PN/DP (Rack 1)
- B#16#01: WinAC RTX Ethernet interface at interface slot 1 (IF1)
- B#16#06: WinAC RTX Ethernet interface at interface slot 2 (IF2)
- B#16#0B: WinAC RTX Ethernet interface at interface slot 3 (IF3)
- B#16#0F: WinAC RTX Ethernet interface at interface slot 4 (IF4)*
*wConnectionType : BYTE; // connection type
- B#16#01: TCP/IP native (compatibility mode)
- B#16#11: TCP/IP native (from firmware 2.4)*
tFbExecTimeLimit : TIME; // maximum amount of time available for the block per cycle
xReady : BOOL; // ready for a database query
xBusy : BOOL; // database query running
xDone : BOOL; // database query completed
xError : BOOL; // database query ended with an error
diResultState : DINT; // status of database query / error number
diResultRows : DINT; // number of received rows from the database query
diResultColumns : DINT; // number of received columns from the database query
tFbExecTimeMax : TIME; // measured maximum utilisation time of the block
tLastRequest : TIME; // measured time of the last request
Data modules
idbSql4Siemens – instance data module for internal use of the function block Sql4Siemens.
dbSqlUserData – user data such as request string array or response string table
Data types (UDT)
utSqlUserRequestST – contains the request string array. The size of the data structures is determined automatically in the module «fbSql4Siemens».
utSqlUserResponseST – contains the response string table. The size of the data structures is automatically determined in the module «fbSql4Siemens».
utSqlRequestBuffer – data buffers for sending SQL requests. The size of the data structures is automatically determined in the module «fbSql4Siemens».
utSqlResponseBuffer – data buffer for receiving SQL responses. The size of the data structures is automatically determined in the module «fbSql4Siemens».
The data types can be adjusted according to the project. The array / data structure sizes are determined according to the amount of data to be read or written.
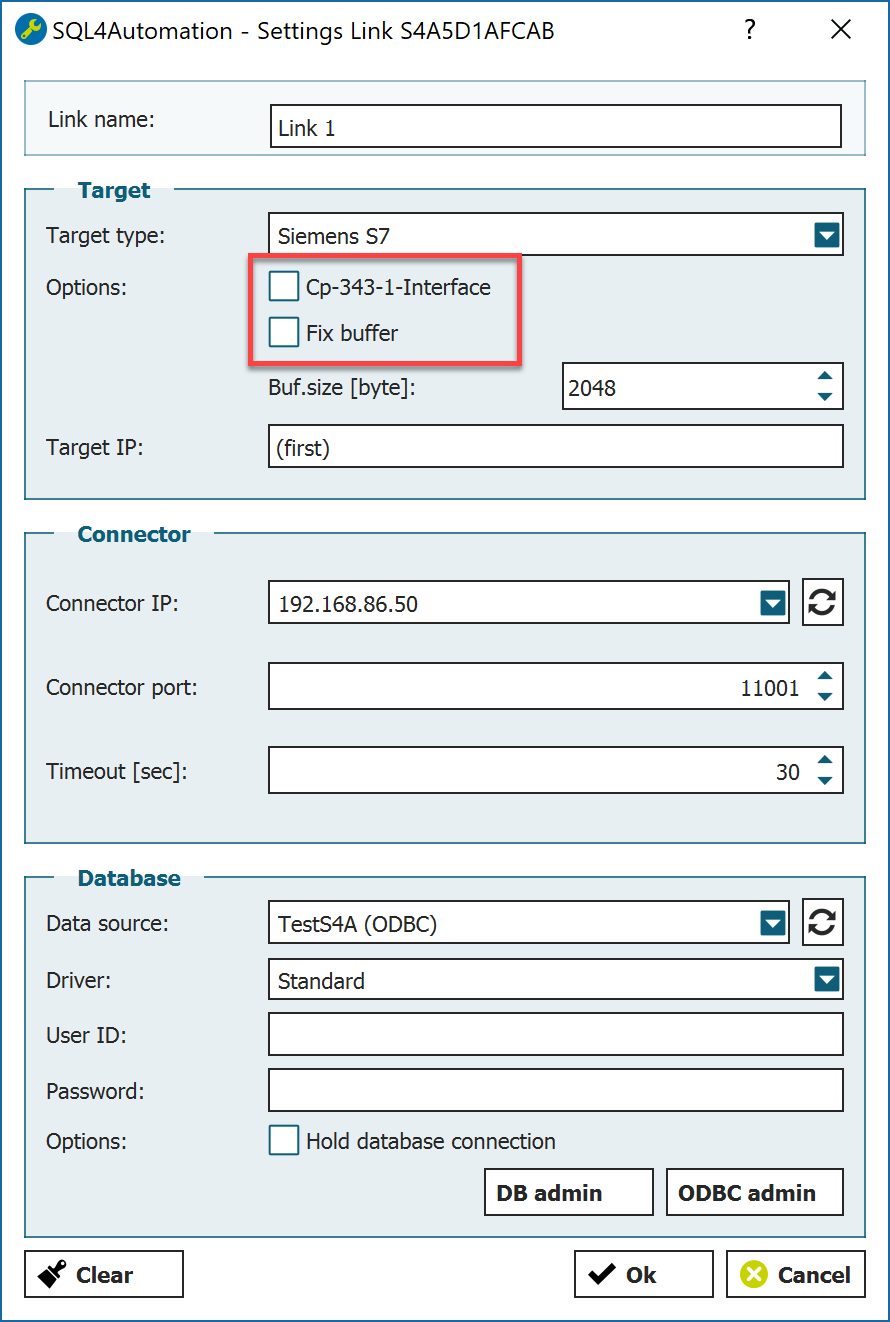
Configuration of the Connector
Further options must be defined for the selected Siemens-target in the Connector:
-
Receive Buffer Receive buffer size in the utSqlResponseBuffer
-
CP 343-1 Interface Deactivate
-
Fix Buffer Deactivate
Ethernet interface settings
In order to establish a communication via the Ethernet interface on the CPU and the connector, it must be parameterised. The IP address of the Ethernet interface must be in the same network address range as the one of the Connector.

The IP address of the CPU can be changed in the hardware configurations and loaded onto the control.
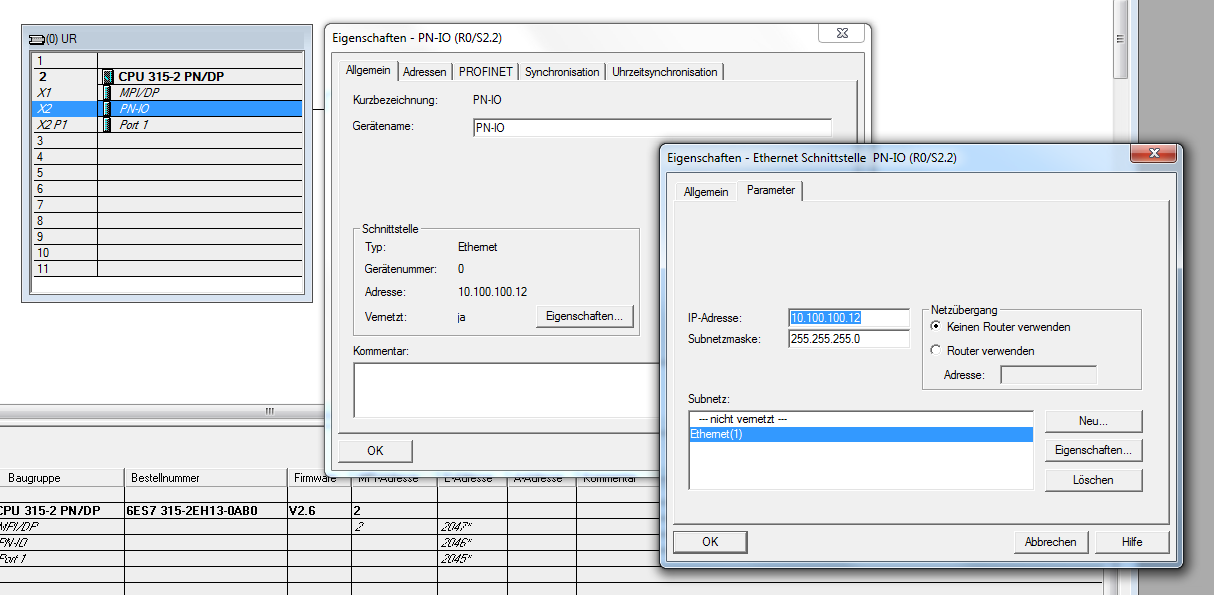
By double-clicking on PN-IO, Properties, the properties window of the PN-IO interface of the CPU is opened up. Here the IP address and the subnet mask can be changed.
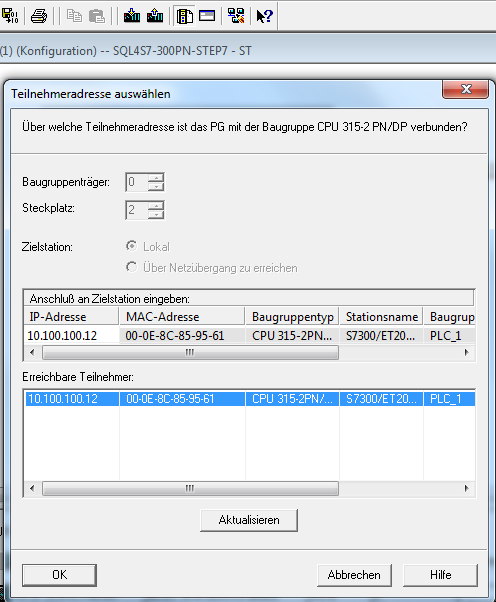
By clicking on the button “load to module” the current hardware configuration can be loaded into the CPU. Display/Update shows all accessible CPUs. Select desired CPU and load current hardware configuration.
Changing the block address
In case there are already blocks with the same address in your project, the SQL4automation blocks can be set to a different address as follows:
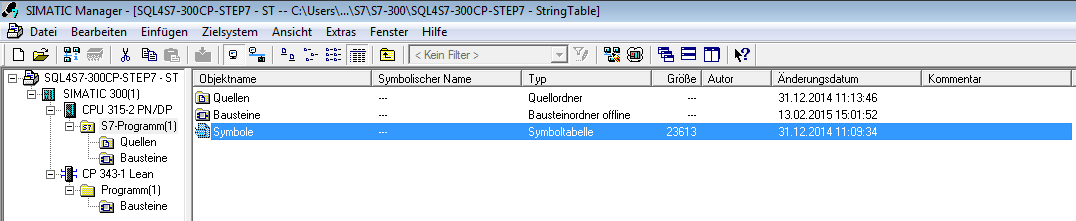
Open the symbol table and change the respective addresses.
Adjust the object name of the blocks to be changed.
Open under Sources, MakeAll and compile.
The sample project
The sample project of the website is executable and, prior to making adaptations to the own application, should be made running first. Thus, possible sources of error may be located more easily.
Adapt the IP address and remote port to your system when opening up the Sql4Siemens in the OB35.
The Connector must be started and the connection to the sample database “S4A_Test_DB.mdb” must be configured.
The configuration of the connection to the database is described in chapter 4.1.2 Setting up the connection to the test database.
The sample program (OB1) contains a program with the 4 basic SQL commands (SELECT, INSERT, UPDATE, DELETE) and shows how to deal with SQL-data. The respective functions can be easily operated with the following monitoring table:
Loading the sample program
The program can be loaded via the Load button.
Operating the sample program
The sample code is accessed from the OB1. There are two blocks with the same function. The first sample is programmed in SCL, the second one in LAD (KOP).
Monitoring table «Example01_SQL_SELECT»
By setting the variable «xSqlSelect», the last 5 records from the sample database are retrieved. If the retrieval has been completed successfully, the «diSqlSelectDoneCount» counter is incremented and the data (column name and data fields) is shown.
If the retrieval has been completed with an error, the «diSqlSelectErrorCount» counter is incremented. In this case, the error code is displayed in the parameter «diResultState». The variable «xSqlSelect» must be reset manually.
Monitoring table «Example02_SQL_INSERT»
By setting the variable «xSqlInsert», a new record is integrated into the sample database. The values are determined through the parameters «iSqlInsertParam1», «fSqlInsertParam2» and «sSqlInsertText1».
If the execution has been successful the counter «diSqlInsertDoneCount» is incremented. The parameter «diSqlInsertedID» , shows under which ID (primary key) the record has been saved in the database.
If the command has been executed with an error, the counter «diSqlInsertErrorCount» is incremented. In this case, the error code is shown in the parameter «diResultState». The variable «xSqlInsert» must be reset manually.
Monitoring table «Example03_SQL_UPDATE»
By setting the variable «xSqlUpdate», an existing record in the sample database is updated. The record to be updated must be specified with the parameter «diSqlUpdateID». The new values are determined through the parameters «iSqlUpdateParam1», «fSqlUpdateParam2» and «sSqlUpdateText1».
If the execution has been successful, the counter «diSqlUpdateDoneCount» is incremented. The parameter «diSqlUpdatedRows» shows how the record was updated (in this case 0 or 1).
If the command has been completed with an error, the counter «diSqlUpdateErrorCount» is incremented. In this case, the error code is displayed in the parameter «diResultState». The variable «xSqlUpdate» must be reset manually.
Monitoring table «Example04_SQL_DELETE»
By setting the variable «xSqlDelete», all records in the sample database whose number (primary key) is smaller or equal to the value in the parameter are deleted. If the execution has been successful, the counter «diSqlDeleteDoneCount» is incremented. The parameter «diSqlDeletedRows» shows how the records where deleted.
If the command has been executed with an error, the counter «diSqlDeleteErrorCount» is incremented. In this case, the error code is shown in the parameter «diResultState». The variable «xSqlUpdate» must be reset manually.
Error codes return value
The variable “diResultState” describes the error.
| Error number | Error description |
|---|---|
| 1 | Unknown SQL command |
| 2 | Query returns more records than defined with MaxRows. Adjust query or increase MaxRows |
| 3 | Query returns more columns than defined with MaxColumns, adjust query or increase MaxColumns |
| 4 | Query returns more data than the defined puffer size. Adjust query or increase the buffer size in the Connector and the control |
| 5 | Query returns at least one value, which is bigger than defined with MaxStringLength. Adjust query or increase MaxStringLength |
| 10 | Internal Connector error |
| 11 | Internal Connector error, database cannot be opened |
| 21 | No IP address defined |
| 22 | No port number defined |
| 23 | Request string is empty |
| 24 | Number of MaxRows not defined |
| 25 | Number of MaxColumns not defined |
| 29 | Size of MaxStringLength invalid |
| 41 | No connection to SQL4automation-Connector established. Turn off firewall, check IP address and remote port |
| 51 | Error in sending the query. Turn off firewall, check IP address and remote port |
| 91 | Timeout error. No response from the Connector within the time frame. |
| 95 | Error in receiving the data |
| >100 | Error numbers of the ODBC database connection |
| 40002 | General error during the SQL query. Request string is invalid |